Privacy and Security Settings Windows 11: The Complete 2026 Guide (Every Setting Explained)
To access privacy and security settings in Windows 11, go to Settings > Privacy and Security. The page covers two areas: Privacy settings (advertising ID, diagnostic data, app permissions, Recall) and Security settings (Windows Defender, BitLocker, Core Isolation, Smart App Control). The single most impactful actions are turning off optional diagnostic data, enabling Controlled folder access, and turning on Memory Integrity.
Windows 11 ships with dozens of privacy and security toggles buried across two dozen subpages. Most guides cover seven of them. This Axeetech guide covers all of them. The Settings > Privacy and Security page controls everything from which apps can see your location, to whether Microsoft records your keystrokes, to whether an AI feature screenshots everything on your screen. You do not need to change every setting.

But you do need to know what each one does. This guide gives you every path, every recommended action, and the quick-start checklist to harden your PC in under 15 minutes.
Also Read: COM Surrogate Delete File Error
Quick-Start: The 14 Most Important Settings to Change Right Now
Use the table below if you want results fast. Come back to the detailed sections to understand why each setting matters.
| Priority | Setting | Path | Action |
|---|---|---|---|
| Critical | Memory Integrity | Windows Security > Device Security > Core Isolation | ON |
| Critical | Tamper Protection | Windows Security > Virus and threat protection > Settings | ON |
| Critical | Ransomware protection | Windows Security > Virus and threat protection > Ransomware protection | ON |
| Critical | Advertising ID | Settings > Privacy and Security > General | OFF |
| Critical | Optional diagnostic data | Settings > Privacy and Security > Diagnostics and feedback | OFF |
| Critical | Tailored experiences | Settings > Privacy and Security > Diagnostics and feedback | OFF |
| Critical | Activity history | Settings > Privacy and Security > Activity history | OFF |
| High | BitLocker/Device Encryption | Settings > Privacy and Security > Device encryption | ON |
| High | SmartScreen (all toggles) | Windows Security > App and browser control | ON |
| High | Firewall (all networks) | Windows Security > Firewall and network protection | ON |
| High | App permissions audit | Settings > Privacy and Security > App permissions | Review each |
| Medium | DNS over HTTPS | Settings > Network and Internet > Wi-Fi > [Network] > DNS | ON |
| Medium | Windows Hello | Settings > Accounts > Sign-in options | Enable |
| Medium | Recall snapshots | Settings > Privacy and Security > Recall and snapshots | OFF (Copilot+ PCs) |

How to Open Privacy and Security Settings in Windows 11
The main path is the same in Windows 11 and Windows 10:
Settings > Privacy and SecurityThe fastest shortcut is Win+I to open Settings, then click Privacy and Security in the left panel. For direct access to specific subsections, press Win+R and use the following Run commands:
Privacy General page:
ms-settings:privacy-generalDiagnostics and feedback page:
ms-settings:privacy-feedbackThe Settings > Privacy and Security page has three logical groups. Security at the top covers Windows Security, Device encryption, Find my device, and For developers. Privacy in the middle covers General, Speech, Inking and typing personalization, Diagnostics and feedback, Activity history, Search permissions, Searching Windows, and Presence sensing. App permissions at the bottom lists every hardware and data access permission Windows manages on behalf of installed apps.
Privacy Settings: General (Advertising ID and Tracking)
The General page controls how Windows collects behavioral data to serve personalized content and ads. Every toggle here is a form of tracking that provides zero benefit to your PC performance or stability.
Navigate to:
Settings > Privacy and Security > GeneralTurn off all four toggles:
- Let apps show me personalized ads using my advertising ID (turns off the unique cross-app tracking identifier Windows assigns to your device)
- Let websites show me locally relevant content by accessing my language list (stops websites from using your language preferences to infer location)
- Let Windows improve Start and search results by tracking app launches (stops Windows from monitoring which apps you open and when)
- Show me suggested content in the Settings app (stops ads and promotional content inside the Settings app itself)
The advertising ID is the most important of these four. It functions like a browser cookie but for apps. Turning it off prevents every installed app from sharing a single tracking identifier to build a cross-app profile of your behavior.
Privacy Settings: Diagnostics, Feedback, and Activity History
This group of settings controls the volume of data Windows sends to Microsoft and how long it stores behavioral data on your device.
Diagnostics and Feedback
Settings > Privacy and Security > Diagnostics and feedbackRequired diagnostic data cannot be disabled. It covers basic hardware information, crash reports, and the data Windows needs to stay updated and stable. This is a reasonable trade-off and not a privacy concern for most users.
Optional diagnostic data covers browsing patterns, typing input, app usage details, and device configuration data. Turn this OFF. It provides no benefit to your PC and feeds into Microsoft’s personalization and advertising systems.
Turn off Improve inking and typing. This sends samples of handwriting and keystrokes to Microsoft for recognition improvement. Turn off Tailored experiences. This uses your diagnostic data to show personalized tips, advertisements, and product recommendations inside Windows.
Tip: To delete all diagnostic data Microsoft has already collected from your device, go to Settings > Privacy and Security > Diagnostics and feedback and click the Delete button under the Diagnostic data section. This clears the stored telemetry from Microsoft’s servers. Required data collection continues going forward but the historical record is removed.
Speech
Settings > Privacy and Security > SpeechTurn off Online speech recognition unless you actively use Cortana, voice typing in Word, or other voice-assistant features. When on, Windows sends voice samples to Microsoft’s cloud for processing and model improvement.
Inking and Typing Personalization
Settings > Privacy and Security > Inking and typing personalizationTurn off the custom inking and typing dictionary. When on, Windows builds a local profile of your typing patterns and handwriting and may share samples with Microsoft for model training.
Activity History
Settings > Privacy and Security > Activity historyTurn off both toggles: Store my activity history on this device, and Send my activity history to Microsoft. Activity history records which apps, files, and websites you interact with. It feeds Windows Timeline and Microsoft 365 activity features. Disabling it does not break any Windows function.
Search Permissions
Settings > Privacy and Security > Search permissionsSet SafeSearch to Moderate or Strict on any shared or family PC. Turn off Cloud content search for both Microsoft account and Work or School account to stop Bing from indexing your account files and calendar as part of Windows search. Turn off Search history and clear the existing record.
Presence Sensing
Settings > Privacy and Security > Presence sensingPresence sensing is new in Windows 11 24H2 and only appears on hardware that includes a presence detection sensor. The feature lets apps detect when you are physically near the PC to trigger behaviors like Wake on approach, adaptive brightness, and auto-lock.
Review the app list and restrict access. No app needs this permission unless you are intentionally using attention-based display features. For related display behavior controls, the AxeeTech guide on display and power settings covers the adaptive brightness configuration that connects to Presence Sensing on supported hardware.
Privacy Settings: App Permissions (The Complete Permission Guide)
App permissions are the most overlooked section of Privacy and Security settings. Windows grants apps access to hardware and personal data through a system that most users have never reviewed.
The Three-Layer Permission Framework
Every permission category in Windows 11 has three separate levels of control:
Level 1 is the master device toggle at the top of each permission page. Turning this off blocks every app on the system from accessing that feature. This is a sledgehammer, not a scalpel.
Level 2 is the Desktop apps toggle in the middle of each page. This controls access specifically for traditional .exe applications installed outside the Microsoft Store.
Level 3 is the per-app toggle list at the bottom of the page. This shows every installed app with its own individual on/off switch. This is where most users should be making changes.
The correct approach for most permissions is to leave the Level 1 master toggle ON, leave the Level 2 desktop toggle ON, and turn off individual apps at Level 3 that have no legitimate reason to access the feature.
Warning: Turning off the master toggle for Camera or Microphone at the top of the permission page blocks ALL apps from accessing that hardware, including Teams, Zoom, and video calling apps. Leave the master toggle ON and restrict access at the individual Level 3 app list instead.
Key App Permissions to Review
Navigate to each permission at:
Settings > Privacy and Security > App permissions > [Permission name]| Permission | Recommended Action | Apps That Legitimately Need It |
|---|---|---|
| Location | ON master, restrict per-app | Maps, Weather, Find My Device |
| Camera | ON master, restrict per-app | Teams, Zoom, Camera app |
| Microphone | ON master, restrict per-app | Teams, Zoom, voice assistants |
| Account info | Review per-app | Apps needing your name or profile picture |
| Contacts | Review per-app | Mail app, Phone Link |
| Calendar | Review per-app | Calendar apps, productivity tools |
| Phone calls | Review per-app | Phone Link only |
| Review per-app | Mail app only | |
| Documents library | Review per-app | Restrict to apps that need document access |
| Downloads folder | Review per-app | Browsers and download managers |
| Pictures library | Review per-app | Photo editors and gallery apps |
| Videos library | Review per-app | Video players and editors |
| File system | Restrict carefully | Broad system-wide access; limit to trusted apps |
| Screenshots | Restrict carefully | Screen capture tools only |

Work through each permission category once per quarter. Newly installed apps sometimes request permissions without making it obvious during setup. The AxeeTech guide on change default app settings covers the related default app and file-type assignment settings that complement the app permissions framework.
Privacy Settings: Windows Recall and Snapshots (Copilot+ PCs)
Windows Recall is an AI feature available exclusively on Copilot+ PCs that include a Neural Processing Unit (NPU). It takes continuous periodic screenshots of your screen and uses AI to make everything you have ever seen on the PC searchable.
The setting appears in:
Settings > Privacy and Security > Recall and snapshotsThis page only appears on Copilot+ PC hardware. If you do not see it, your PC does not have Recall.
Warning: Windows Recall captures screenshots of everything on your screen, including banking websites, login credentials typed into browsers, private messages, confidential work documents, and medical records. On any Copilot+ PC, go to Settings > Privacy and Security > Recall and snapshots and confirm Save snapshots is set to Off unless you have made a deliberate choice to use this feature.
To disable Recall completely, set Save snapshots to Off. To delete all screenshots already stored, click the Delete snapshots button on the same page. To exclude specific applications from being captured, use Filter apps and websites to add them to the exclusion list. DRM-protected content and InPrivate or private browsing sessions are excluded from Recall automatically.
Recall stores its screenshot database locally on the device, encrypted using BitLocker or Device Encryption. If you disable Device Encryption, Recall also stops working. Both features share the same encryption dependency.
Activity History and Recall are separate features, but disabling both together provides the most thorough baseline privacy posture on Copilot+ hardware.
Security Settings: Windows Defender (Virus, Firewall, and SmartScreen)
The Windows Security app is the central console for the security features built into Windows 11. Open it from:
Settings > Privacy and Security > Windows Security > Open Windows SecurityVirus and Threat Protection
Keep Real-time protection ON at all times. This is Microsoft Defender’s active scanning engine. Disabling it leaves the PC entirely unprotected from active threats.
Keep Cloud-delivered protection ON. It connects Defender to Microsoft’s threat intelligence cloud and provides faster response to new malware that has not yet been added to local signature databases.
Keep Tamper protection ON. This setting prevents malware and unauthorized software from modifying or disabling Defender’s settings. If a threat disables this first, every other Defender protection becomes ineffective.
Controlled Folder Access (Ransomware Protection)
Controlled folder access prevents unauthorized applications from modifying files in protected folders. Enable it at:
Windows Security > Virus and threat protection > Ransomware protection > Controlled folder access > OnAfter enabling, add additional folders to the protected list. The default protection covers Documents, Desktop, Pictures, and Videos. Add any folder that contains files you cannot afford to lose.
If a legitimate application gets blocked after enabling Controlled folder access, add it to the allowed app list through:
Windows Security > Virus and threat protection > Ransomware protection > Allow an app through Controlled folder accessFirewall
Windows Security > Firewall and network protectionKeep the firewall enabled for all three network profiles: Domain, Private, and Public. The Public network profile is the most critical. It protects against threats on coffee shop, hotel, airport, and other untrusted Wi-Fi networks where other devices may be hostile.
Audit the allowed apps list periodically. Remove entries for applications you no longer use.
Reputation-Based Protection (SmartScreen)
Windows Security > App and browser control > Reputation-based protectionTurn on all four SmartScreen toggles:
- Check apps and files (warns before running downloaded files with poor reputation)
- SmartScreen for Microsoft Edge (warns before visiting malicious sites)
- Potentially unwanted app blocking (blocks adware, browser hijackers, and PUPs)
- SmartScreen for Microsoft Store apps (screens Store apps against reputation data)
Potentially unwanted app (PUA) blocking is frequently missed. It does not block full malware but stops the grey-area software that hijacks browser settings, installs toolbars, and adds startup programs without clear user consent.
Exploit Protection
Windows Security > App and browser control > Exploit protectionLeave the default settings in place. The system settings control CFG (Control Flow Guard), DEP (Data Execution Prevention), ASLR (Address Space Layout Randomization), and SEHOP (Structured Exception Handling Overwrite Protection). These protect against memory exploitation techniques used in targeted attacks. Only change these settings if a specific legacy application explicitly requires it.
If any of the Windows Security features above trigger issues after a system update, the AxeeTech guide on how to fix Windows Update issues easily covers every repair method for update-related security tool conflicts.
Security Settings: Smart App Control
Smart App Control (SAC) is Windows 11’s most aggressive application protection layer. It evaluates every app before allowing it to run using Microsoft’s cloud intelligence database.
Windows Security > App and browser control > Smart App Control settingsWarning: Smart App Control only works on a clean installation of Windows 11. If you upgraded from Windows 10 or from an earlier Windows 11 build, the feature shows as Off with no option to enable it. The only way to activate SAC on an upgraded system is a full, clean reinstall of Windows 11. Check your status now. If it shows Off, that is your current state permanently until a fresh install.
For clean installations where SAC is available, start on Evaluation mode. In Evaluation, SAC monitors app reputation quietly without blocking anything. After one to two weeks of normal use, switch to On. This allows SAC to build accurate context about which apps you actually use before it starts enforcing restrictions.
Once switched from On to Off, SAC cannot be re-enabled without reinstalling Windows. Treat the Off setting as permanent before clicking it.
Tip: To check your Smart App Control status, go to Windows Security > App and browser control > Smart App Control settings. If it shows Evaluation or On, your system supports it and protection is active. If it shows Off with a grayed-out toggle and no option to change it, your only path to SAC is a clean Windows reinstall.
Security Settings: Core Isolation and Memory Integrity
Core Isolation uses virtualization-based security (VBS) to isolate critical Windows processes in a separate virtualized memory environment. Memory Integrity is the component within Core Isolation that prevents malicious code from being injected into those protected processes.
Windows Security > Device security > Core isolation > Core isolation details > Memory integrity: On
Enable Memory Integrity and restart when prompted. The restart is required to activate the virtualization layer.
Warning: If the Memory Integrity toggle is grayed out and unavailable, an incompatible driver installed on your PC is blocking virtualization. Open Device Manager (Win+X > Device Manager), look for any entry marked with a yellow warning triangle, and update or remove that driver. After resolving the driver conflict, return to Core Isolation and enable Memory Integrity. The AxeeTech guide on how to manually update device drivers in Windows covers every method for finding and installing the correct driver version for your hardware.
After enabling Memory Integrity, if Windows enters a repair loop on the next restart, the AxeeTech guide on what to do when your system is repairing itself covers the exact sequence of what Windows is doing and when it is safe to intervene.
Security Settings: BitLocker and Device Encryption
Drive encryption protects your data if the physical device is stolen. Without encryption, anyone with physical access to the drive can read every file on it, bypassing the Windows login screen entirely.
Windows 11 Home:
Settings > Privacy and Security > Device encryption > OnHome edition uses Device Encryption, a simplified version of BitLocker that activates automatically when a Microsoft account is linked. The recovery key is stored in your Microsoft account at account.microsoft.com.
Windows 11 Pro and Enterprise:
Control Panel > BitLocker Drive EncryptionOr search “Manage BitLocker” in the Start menu.
Pro gives you full BitLocker with choices of TPM-only unlocking, TPM plus PIN, or USB key. Choose “Encrypt entire drive” for complete protection including free space. Use XTS-AES encryption mode for drives that stay inside the PC.
Warning: Save your BitLocker recovery key in two places: your Microsoft account AND a printed physical copy stored somewhere separate from the PC. If the TPM chip resets after a firmware update, the recovery key is the only way back in. Losing both copies means permanent, irrecoverable data loss. There is no backdoor, not even for Microsoft support.
For gamers or users concerned about performance: encryption overhead on an NVMe SSD is negligible during normal use. Theoretical storage-intensive benchmark impacts top out at 2-5%. At 1080p and above on modern hardware, no difference in game load times is measurable.
Windows 11 Home users who want the full BitLocker feature set including removable drive encryption can use Hasleo BitLocker Anywhere as a third-party solution with the same encryption standard.
Sign-In Security (Windows Hello, PIN, and Dynamic Lock)
The most common entry point for PC compromises is not a software exploit. It is physical access through an unattended unlocked machine or a weak login credential. These settings close that gap.
Settings > Accounts > Sign-in optionsEnable Windows Hello Face if your PC has an infrared camera. Facial recognition through Windows Hello is phishing-resistant because the authentication happens locally on the device using a camera hash, not a transmittable password. Enable Windows Hello Fingerprint if your PC has a fingerprint reader.
Use a PIN instead of a traditional password for everyday sign-in. A Windows PIN is stored locally on the device and is never transmitted over the network, unlike a Microsoft account password which travels through servers. A PIN breach only compromises one physical device, not your entire Microsoft account.
Enable Dynamic lock. This feature pairs your Windows PC with your smartphone via Bluetooth and locks the screen automatically when the phone moves out of range. Set it up at Settings > Accounts > Sign-in options > Dynamic lock > Allow Windows to automatically lock your device when you are away.
Set Require sign-in to Every time. Disable automatic login so every restart requires a password or PIN.
The most important security habit in Windows is a keyboard shortcut. Press Win+L from any screen to lock the PC instantly. Use it every time you walk away from your desk.
DNS over HTTPS (Encrypt Your Web Queries)
Every website you visit begins with a DNS query that converts the domain name into an IP address. Without DNS over HTTPS (DoH), these queries travel in plain text and are visible to your ISP, network administrator, and anyone monitoring the connection. Enabling DoH encrypts every DNS query.
Settings > Network and Internet > Wi-Fi > [Your network name] > Hardware properties > DNS server assignment > Edit > ManualSet Preferred DNS to your chosen provider’s IP address, then change the DNS over HTTPS dropdown from Off to On (automatic template). Repeat for Alternate DNS if desired.
| DNS Provider | IPv4 Address | Privacy Focus | Extra Features |
|---|---|---|---|
| Cloudflare | 1.1.1.1 | High | Fastest global resolution; 1.1.1.2 adds malware blocking |
| Quad9 | 9.9.9.9 | High | Blocks malware and phishing domains at DNS level |
| 8.8.8.8 | Low-moderate | Highly reliable; Google collects query data | |
| NextDNS | Custom IP | Very high | Configurable filtering and logging; free tier available |
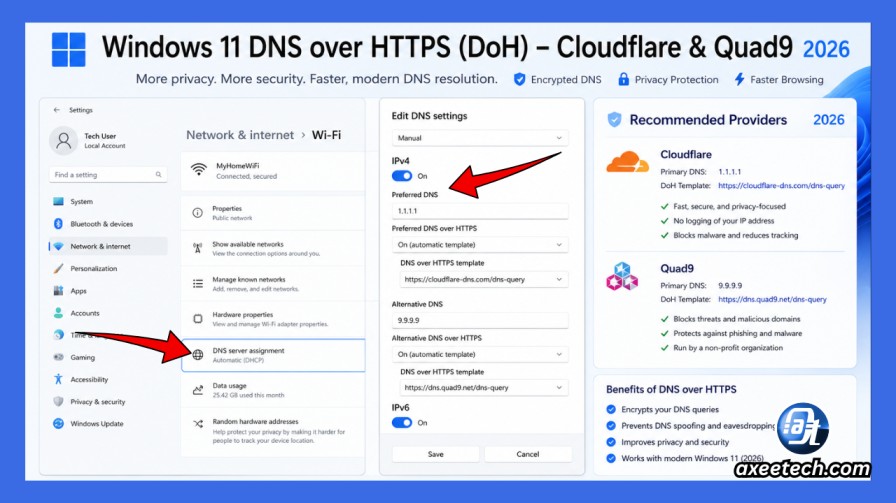
Cloudflare 1.1.1.1 is the fastest globally and privacy-focused. Cloudflare 1.1.1.2 adds malware blocking without configuration. Quad9 9.9.9.9 blocks DNS requests to known malware and phishing domains automatically, adding a free network-level protection layer.
Windows 11 Home vs Pro: Security Feature Differences
Not every security feature described in this guide is available on Windows 11 Home. The table below shows every security feature that differs between editions.
| Feature | Windows 11 Home | Windows 11 Pro |
|---|---|---|
| BitLocker | Device Encryption (limited) | Full BitLocker + removable drives |
| Smart App Control | Yes (clean install only) | Yes (clean install only) |
| Core Isolation and Memory Integrity | Yes | Yes |
| Windows Defender Antivirus and Firewall | Yes | Yes |
| Group Policy Editor | No | Yes |
| Windows Sandbox | No | Yes |
| Hyper-V | No | Yes |
| Windows Defender Application Guard | No | Yes |
| Remote Desktop (host) | No | Yes |
| Domain join | No | Yes |
| Credential Guard | No | Yes (enterprise deployment) |
Group Policy is the most significant Pro-only feature for privacy. It gives granular control over telemetry, cloud sync, and app access at a policy level rather than through individual settings toggles. Advanced users on Pro should explore Group Policy as a cleaner alternative to third-party privacy tools.
O&O ShutUp10++ and Advanced Privacy Tools
O&O ShutUp10++ provides toggles for privacy settings that are buried in the Windows Registry and Group Policy, inaccessible through the normal Settings interface. It is free and available at oo-software.com.
Warning: Create a System Restore point before using O&O ShutUp10++ or any registry-based privacy tool. Open Control Panel > System > System Protection > Create and name it before making any changes. ShutUp10++ is safe when used carefully with individual toggles reviewed one at a time. Use the Recommended settings option for a conservative starting point.
ShutUp10++ does not edit host files or firewall rules aggressively, which means it does not break Windows Update, the Microsoft Store, or account sign-in. Avoid third-party Windows privacy tools that do edit the hosts file or add aggressive firewall outbound rules. These tools regularly break Windows Update delivery and Microsoft Store authentication in ways that are difficult to diagnose and reverse.
For Windows 11 Pro users, Group Policy (gpedit.msc) provides the same control without any third-party software and is fully reversible through the same interface.
A general Windows troubleshooter covers the built-in automated diagnostic tools that identify which settings changes have caused functionality problems and can suggest reversals before a manual restore point is needed.
Frequently Asked Questions
How do I open Privacy and Security settings in Windows 11?
Press Win+I to open Settings and click Privacy and Security in the left panel. Alternatively, press Win+R and type ms-settings:privacy-general to go directly to the General privacy page. The full Settings path is Settings > Privacy and Security. The page is divided into three groups: Security at the top, Privacy in the middle, and App permissions at the bottom. Each group contains multiple subsections covering individual features and permissions.
What privacy settings should I turn off in Windows 11?
The highest-priority privacy settings to turn off are the Advertising ID (Settings > Privacy and Security > General), Optional diagnostic data (Settings > Privacy and Security > Diagnostics and feedback), Tailored experiences (same page), and both Activity history toggles (Settings > Privacy and Security > Activity history). Additionally, turn off Online speech recognition, Inking and typing personalization, cloud content search for your Microsoft account, and review every permission in the App permissions section to remove access from apps that have no legitimate reason to hold it.
How do I disable the advertising ID in Windows 11?
Go to Settings > Privacy and Security > General. The first toggle is “Let apps show me personalized ads using my advertising ID.” Turn it Off. This disables the cross-app tracking identifier that Windows assigns to your device. Apps will still show ads, but they will not be able to share a common identifier to build a behavioral profile across multiple applications. This is the single most impactful General privacy setting to change.
What is the difference between required and optional diagnostic data?
Required diagnostic data is the baseline information Windows sends to Microsoft to keep the operating system stable, secure, and updated. It includes hardware configuration, error reports, and crash data. It cannot be disabled. Optional diagnostic data goes further and includes browsing patterns, app usage details, typing samples, and device configuration information used for Microsoft’s personalization, advertising, and product improvement systems. Optional diagnostic data can be turned off at Settings > Privacy and Security > Diagnostics and feedback. Turn it off. Required data continues regardless.
How do I enable BitLocker on Windows 11 Home?
On Windows 11 Home, the feature is called Device Encryption rather than BitLocker. Go to Settings > Privacy and Security > Device encryption and turn it On. Device Encryption requires a Microsoft account to be signed in so the recovery key can be saved automatically. After enabling, verify your recovery key is stored at account.microsoft.com under Devices > BitLocker recovery keys. Home users who want the full BitLocker feature set including removable drive encryption can use Hasleo BitLocker Anywhere as a third-party alternative.
What is Memory Integrity and should I turn it on?
Memory Integrity is a component of Core Isolation that uses virtualization-based security (VBS) to prevent malicious code from being injected into high-security Windows processes. It should be turned on for almost every user. Access it at Windows Security > Device security > Core isolation details > Memory integrity. If the toggle is grayed out, an incompatible driver on your system is blocking virtualization. Open Device Manager, find the driver marked with a yellow warning triangle, and update or remove it. After resolving the conflict, Memory Integrity becomes available.
What is Smart App Control and why can I not enable it?
Smart App Control uses Microsoft’s cloud intelligence to evaluate app reputation before allowing execution, blocking untrusted and unsigned applications. It is only available on a clean installation of Windows 11. If you upgraded from Windows 10 or from a previous Windows 11 version, Smart App Control shows as Off with no toggle to enable it. This is permanent until you perform a fresh clean install of Windows 11. Check your status at Windows Security > App and browser control > Smart App Control settings. Evaluation mode is the correct starting point on clean installs.
How do I disable Windows Recall on a Copilot+ PC?
On Copilot+ PCs, go to Settings > Privacy and Security > Recall and snapshots. Set Save snapshots to Off to stop Recall from taking further screenshots. Click Delete snapshots to remove all screenshots already stored on the device. Use Filter apps and websites to exclude specific applications from capture if you choose to leave Recall partially active. If this page does not appear in your Settings, your PC does not have Recall because it is not Copilot+ hardware with an NPU.
How do I turn on ransomware protection in Windows 11?
Open Windows Security and go to Virus and threat protection. Scroll down to Ransomware protection and click Manage ransomware protection. Turn on Controlled folder access. After enabling it, click Protected folders to add any folder containing important files beyond the default set (Documents, Desktop, Pictures, Videos). If a legitimate application such as a photo editor or document manager gets blocked after this, go back to Ransomware protection and click Allow an app through Controlled folder access to add it to the trusted list.
Is DNS over HTTPS worth enabling on Windows 11?
Yes for most users, especially on public or shared Wi-Fi networks. Without DNS over HTTPS, every website you visit begins with a plain-text DNS query that your ISP, network operator, and anyone monitoring the connection can read. Enabling DoH encrypts these queries and prevents that surveillance. The performance impact is negligible, often under 10 milliseconds per query. Cloudflare 1.1.1.1 and Quad9 9.9.9.9 are the best choices for privacy-focused users, with Quad9 adding free malware domain blocking at the DNS level. Enable DoH at Settings > Network and Internet > Wi-Fi > your network > Hardware properties > DNS server assignment > Edit.

Axee Davies is the founder of AxeeTech, publishing gaming guides, codes, and Windows how-tos since March 2013. A tech enthusiast for 13+ years — starting with smartphones and Android rooting — he now runs a site that puts out a new guide every day for Roblox players, traders, and Windows users. More about AxeeTech
More Guides You May Like
 What Is the Blue Dot Beside the Battery in Samsung Phones After the One UI 9 Update?
 ArtCraft Review: 12 Free Adobe & Microsoft Office Alternatives (Launcher + Download Guide)
 Star Citizen Retribution: What It Is and Can You Buy It
 Star Citizen Ranta Dung: Where to Find It and Price
 Star Citizen Wikelo Ships: How to Get War Special Rewards
 Star Citizen Sabre Firebird: Specs, Price and Where to Buy
 Star Citizen Executive Hangar Guide: Timer and Rewards
 Star Citizen Teach’s Ship Shop: Location and Teach’s Special