From Keyframes to AI: Audio Ducking Evolution in Filmora
Recent audio balancing technologies have revolutionized how editors refine their videos. Early editors relied on manual keyframing for creating a balance of speech and music in a film. Advanced tools use AI-driven audio ducking to detect the speech in a video to automatically decrease the music volume.
Wondershare Filmora is among the AI tools that introduce this utility in their video editing suite. This article is a detailed review of audio ducking and how it can be executed in Filmora.
Part 1. What Is Audio Ducking?
Video editing professionals need to balance the volume of music and speech to enhance the audibility of words. Audio Ducking is a technology that automatically identifies dialogue in a film and reduces the music’s volume. There are 2 approaches for audio balancing in video editing: automatic and manual.
Manual vs. Automatic Approach Overview
The following section sheds light on this concept and compares manual and automatic ducking approaches for audio balancing:
| Feature | Automatic Audio Ducking | Manual Audio Ducking |
| Workflow | Uses AI or smart detection to lower the background music automatically | Requires editors to adjust audio levels by hand |
| Speed | Fast and efficient for quick editing | Time-consuming, especially for long videos |
| Accuracy | Detects dialogue automatically and balances sound instantly | Depends on the editor’s skill and attention to detail |
| Consistency | Maintains steady voice clarity throughout the video | Can lead to uneven audio if not edited carefully |
| Learning Curve | Easy for new creators | Higher learning curve for beginners |
Part 2. Traditional Manual Audio Ducking (Volume Automation Method)
The concept of manual volume automation is not new. Go through the following section to learn the details of traditional manual audio ducking:
Keyframe-Based Volume Control
The manual volume control via keyframes gives editors the ability to manually adjust the audio level at certain points in the timeline. The music and dialogue volume can be adjusted separately by the creator for each scene to ensure better audio audibility.
Challenges of Manual Ducking
While manual ducking ensures a personalized level of volumes, it brings many challenges. The following points discuss the issues faced by editors during keyframe-based volume control:
- Time-Consuming: Manual keyframing is done frame-by-frame and is time-consuming.
- Inconsistency in Audio Levels: If there are no automation facilities, then maintaining audio level consistency in a video can be challenging.
- Complexity in Editing: This technique can be difficult for beginners to perform and demands advanced editing skills.
- Increased Risk of Errors: Errors can occur when volume is manually changed, and the dialogue parts may be omitted from the video.
When Manual Audio Ducking Is Still Useful
Despite the challenges and working complexities, manual audio ducking is still useful. The following points discuss the benefits of manual volume adjustment:
- Creative Audio Control: Manual methods of audio ducking are useful when editors want full control over sound timing and emotional impact.
- Complex Multi-Layered Audio: Users working with complex audio with multiple tracks can benefit from manual fine-tuning.
- Custom Cinematic Editing: Editors editing film-style videos may need hand-crafted audio adjustments to ensure professional-level results.
- Selective Sound Prioritization: Editors can manually emphasize specific sounds or dialogue moments that automatic ducking may miss.
Part 3. Automatic Audio Ducking in Wondershare Filmora
After exploring the challenges of manual audio ducking, it is clear that the video outcomes may not be good using this technique. It is better and more reliable to use an AI tool for automatic volume adjustments. Filmora is an AI-based video editing software with extensive audio editing capabilities, such as AI Audio Ducking.
The Filmora audio ducking will automatically detect the voice in a video and suppress the audio intensity of the background music. This creates a smooth audio and clear, audible speech. Users can set custom settings to ensure high-level audio results and errorless audio ducking.
Key Features
- Fade-In and Fade-Out Controls: These controls help to achieve smooth audio transitions and avoid sudden volume fluctuations.
- Adjustable Fade Position and Duration: Editors can fade the duck effect in and out as they please with the adjustable Fade Position feature, and for the duration they want.
- One-click Audio Ducking Toggle: This one-click feature is easy to operate for beginners and eases the use of Filmora for video editing.
- Personalized Ducking Intensity: Use the dedicated Duck Amount slider to set the intensity of the duck effect for more realistic results.
A Guide to Using Wondershare Filmora for Audio Ducking
Wondershare Filmora offers an easy and usable workflow for automatic ducking. The following section is a guide to using this tool for auto volume adjustments:
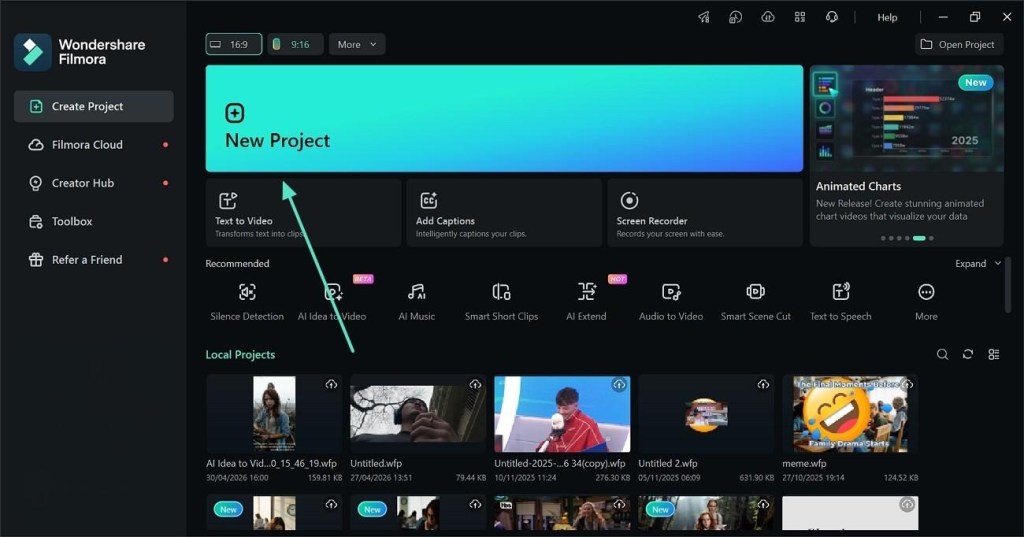
Step 1. Start a New Project and Drag the Video to the Timeline
To begin with, select the “New Project’ button and drag the video to the timeline after importing it.
Step 2. Enable Audio Ducking and Set Its Levels
When the editing panel automatically opens, enter the “Audio” tab and expand the “Basic” section. Now, scroll down and enable the “Audio Ducking” toggle and enter settings using the sliders.

Step 3. Save the Final Video to the Device
Once the video is ready, click the “Export” button at the top right to save the video to the device.

Conclusion
To sum up, manual methods of audio ducking are outdated and bring many challenges while editing the video. This article highlighted the significance of AI adjustments to audio levels and explored using Wondershare Filmora for this purpose. This tool offers automated speech recognition and a fast workflow that supports users of all skill levels.
Note to Reader: This section is an independent editorial review based on publicly available product information and comparative analysis. It is intended for informational purposes only and does not represent the official views or endorsements of any publisher, software company, or media organization.

Axee Davies is the founder of AxeeTech, publishing gaming guides, codes, and Windows how-tos since March 2013. A tech enthusiast for 13+ years — starting with smartphones and Android rooting — he now runs a site that puts out a new guide every day for Roblox players, traders, and Windows users. More about AxeeTech
More How to You May Like
 Top 3 Free online MBOX to PST Converters
 Windows Resource Protection Could Not Start the Repair Service
 Night Light Not Working in Windows 11: 7 Easy Fixes
 Windows 11 Update Stuck at 46%: 7 Proven Fixes
 Start Menu Not Working in Windows 11: 7 Fixes That Work
 Repair Windows 10 From USB: 7 Step-by-Step Fixes
 BitLocker Waiting for Activation: 6 Fixes That Work
 Windows RE Image Was Not Found: 6 Fixes That Work [Repair Builder]