Flex Securly: Upload All Students to the All Student Group
Flex Securly is the name many school staff use for Flex, the scheduling tool from Securly, and one of the most common admin jobs is uploading students into a group. This guide shows how to upload all your students into the “All Student” group in Flex Securly using a CSV file, in 10 clear steps.
You will open the Groups (Rosters) page, find your group, edit it, and add students from a CSV file. The whole process takes about a minute once your file is ready, and it is the fastest way to add a large class list to Flex Securly in one go.

Before You Start With Flex Securly
- Admin or teacher access to Flex, so that you can see the Groups (Rosters) page.
- A CSV file with your student list. Flex offers a “Download example file” link on the upload box, so use that to check the format.
- Your group name. The list shows groups named after the teacher, followed by “All Student”.
Securly’s own documentation on adding users via CSV explains that CSV upload suits schools that do not roster through a third-party source, or that have a large number of users to add. If your school syncs rosters automatically, ask your Securly administrator before you change a group by hand.
How to Upload All Your Students in Flex Securly (10 Steps)
Student names, emails and staff details in the screenshots below are blurred for privacy.
Quick overview:
- Open Flex and click Groups (Rosters)
- Click Search
- Type your last name
- Find your “All Student” group
- Click the pencil (edit) icon
- Click From CSV
- Click Select a file to upload
- Choose your CSV file and upload it
- Click Update
- You are done
Step 1: Open Flex and click Groups (Rosters)
In the left menu, find the Students section and click Groups (Rosters).

Step 2: Click Search
The Groups page lists every group with its source, access type and owner. Click the search box at the top.

Step 3: Type your last name
Group names start with the teacher’s name, so your last name brings up your group.
Step 4: Find your “All Student” group
Look for the row that ends in “All Student” and check that the owner is you.
Step 5: Click the pencil (edit) icon
It sits at the end of the row, next to the view and copy icons.

Step 6: Click From CSV
In the Update group window, go to Select students and click From CSV.
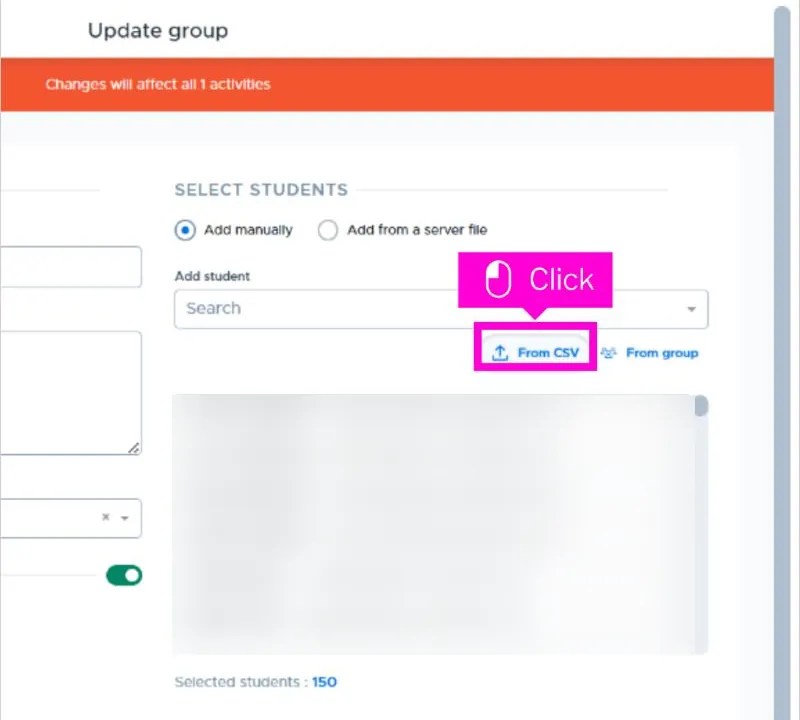
Step 7: Click Select a file to upload
A box opens for your file.

Step 8: Choose your CSV file and upload it
Pick the file on your computer, then click Upload. The box also has a Close button if you need to back out.
Step 9: Click Update
Check the selected students count, then click the blue Update button to save the group.

Step 10: You are done
Your students now sit in the All Student group.

What You See in the Update Group Window
- A warning banner: it says that changes will affect all activities linked to the group, so edit with care.
- Add manually or Add from a server file: two options for choosing students.
- From CSV and From group: shortcuts to bring in a whole list at once.
- Selected students: a running count that goes up after your file uploads.
- Cancel and Update: Cancel discards your changes, and Update saves them.
Tips for a Clean Flex Securly Upload
- Download the example file first and copy its format exactly.
- Save your spreadsheet as a CSV file, not as an Excel workbook.
- Keep names and email addresses consistent with how your school lists students.
- Check the selected students count before you click Update.
- Work from a school-approved student list and never share it outside the school.
Flex Securly Upload Not Working?
- The file will not upload: check that it is a CSV, and that the columns match the example file.
- Students are missing: search for them in the Add student box and add them manually.
- You cannot edit the group: some groups are synced automatically and may not be editable. Ask your Securly administrator.
- Wrong group edited: click Cancel, reopen the correct row, and try again.
Flex Securly FAQ
What is the All Student group? It is a group that holds a teacher’s whole student list, so activities can be assigned to everyone at once.
Can I add one student instead of a file? Yes. On the official app you can use the Add student search box in the same Update group window.
Do I need an administrator? That depends on your school’s permissions. If you cannot see Groups (Rosters), ask your Flex administrator.
More School Tech Guides
Working with school tools? See how to host Blooket when the teacher dashboard is blocked, our Amplify join guide for students and our Gimkit join guide.
Related Guides
Working with school tools? These related guides may help:
- Educator’s Handbook office referral guide
- Blooket WebSocket error fix for school WiFi and filter problems
- Unblocked Blooket links for GoGuardian
- Ekadence AUHSD module copy guide

Axee Davies is the founder of AxeeTech, publishing gaming guides, codes, and Windows how-tos since March 2013. A tech enthusiast for 13+ years — starting with smartphones and Android rooting — he now runs a site that puts out a new guide every day for Roblox players, traders, and Windows users. More about AxeeTech